Sigfox
![]()

This plugin is an interface for using Sigfox HTTP Callback feature in an optimized way, providing features to easily integrate these devices with Thinger.io Platform, such as automatic device and storage provisioning and both uplink and downlink cloud processing.
Plugin Features
- Automatic device and bucket provisioning for every new device that is included in the same Sigfox "Device Type".
- Store Sigfox device metadata: device location, signal quality, hardware serial, etc.
- Store device data automatically in data buckets so it can be easily used from the console.
- Custom uplink data processing with NodeJS, for both
payload_raworpayload_fields. - Support for defining custom downlink callbacks in NodeJS, so it is possible to configure downlink data in an user-friendly format (JSON), and then convert it to
payload_raworpayload_fields, as required by TTN network.
Sigfox Concepts
For a better understanding of the following sections, here is described some basic Sigfox concepts:
- Device: It is a hardware device with an official Sigfox interface.
- Gateway: It is Sigfox infrastructure hardware interface that basically receives messages from multiple edge devices and pushes them to Sigfox server over IP communication. These gateways are exclusively property of Sigfox company.
- Uplink: It is a data flow which represents messages sent from a device to the sigfox cloud. There are two different uplink processes: unidirectional uplink (single data communication from the device to Sigfox network) and bidirectional uplink, that also allows to Sigfox system sending a Downlink to the device.
- Downlink: It is a data flow which represents messages sent from the Sigfox cloud to a device.
- Device Type: It is a concept that defines a group of devices of the same type, normally sending the same kind of data both in uplink and downlink).
Info
Learn how to configure Sigfox Callback to send data to Thinger.io platform here
Plugin Configuration
In this section it is described the different interfaces that can be used to configure the Sigfox plugin.
Applications
Every Sigfox "Device Type" that is integrated over this plugin, should define a new profile in Thinger.io plugin, with the same identifier as defined in Sigfox Platform. Note that each Sigfox Device Type defined in this way will allow to customize the plugin behaviour for that kind of devices.
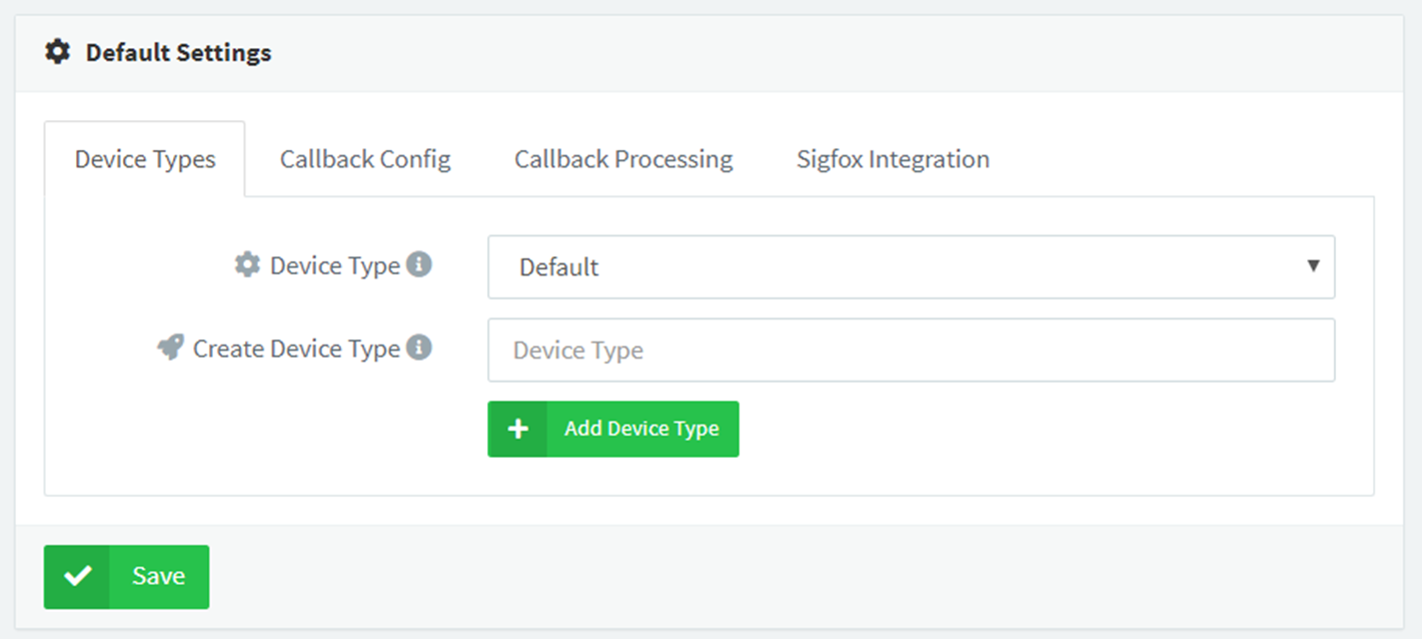
It is possible to create as many Device Types profiles as required. To configure a new profile, just select the id from the Device Types dropdown, and then navigate to the other plugin sections.
Warning
Always create the Device Type with the same identifier as defined in Sigfox cloud.
Callback Config
The uplink behaviour allows to configure how the plugin will react on new information received from Sigfox.

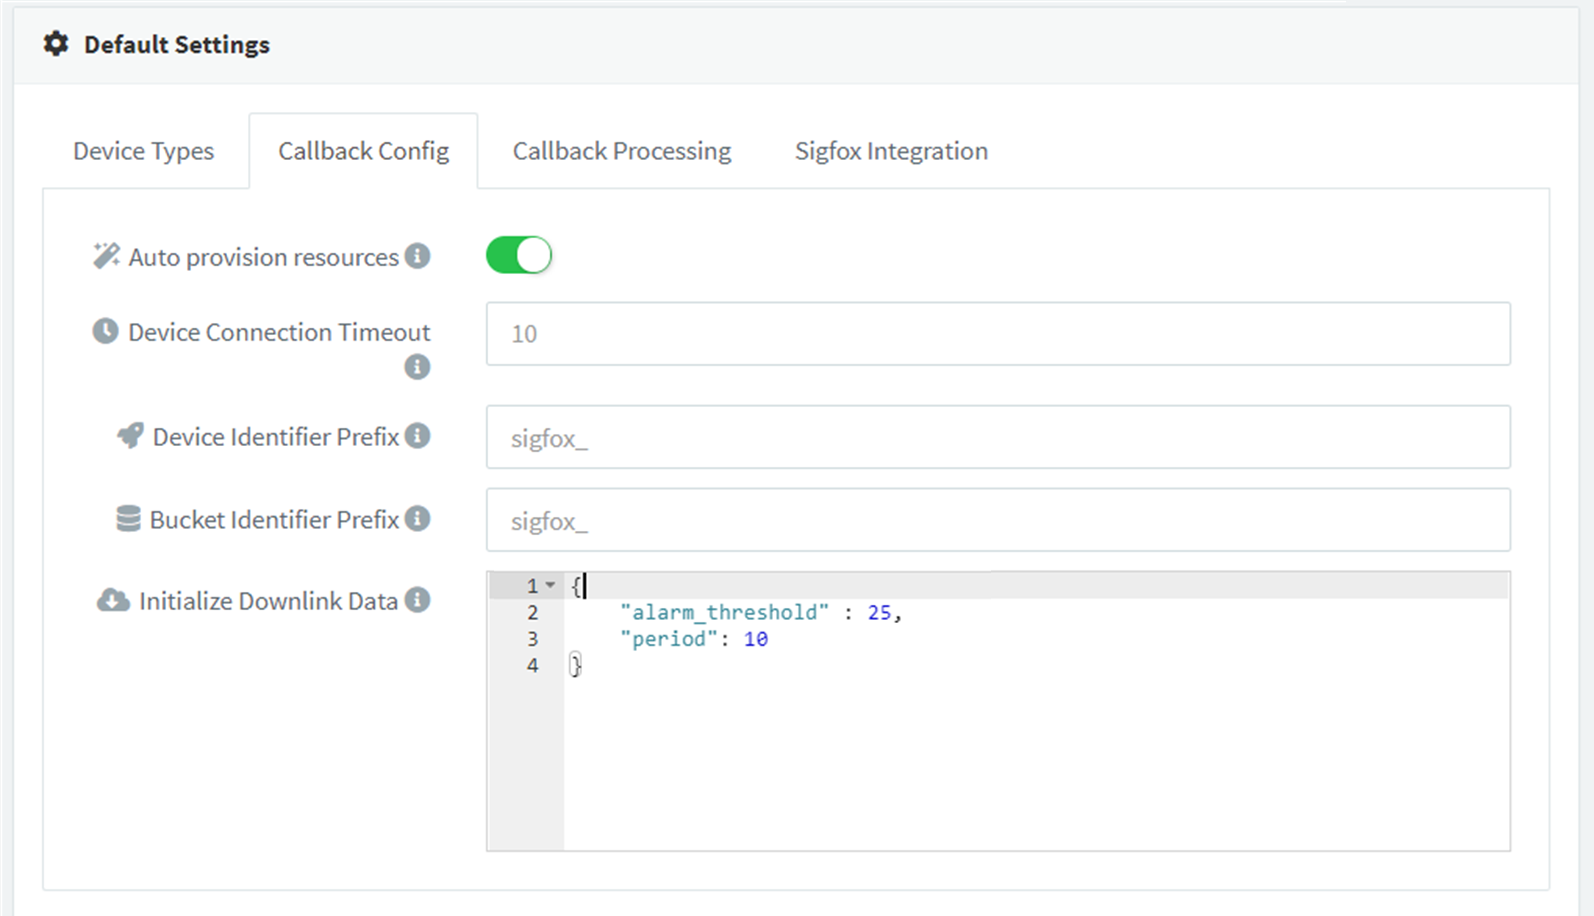
The configurable parameters are the following:
- Auto provision resources: Enable or disable automatic resource provisioning while receiving messages for non created devices of the same Sigfox "Device Type".
- Device connection timeout: When creating a new device, establish the device connection timeout in minutes, so the platform can consider the device as disconnected after a fixed time without receiving a message.
- Device identifier prefix: When creating a new device, create it with a custom prefix + the original device id.
- Bucket identifier prefix: When creating a new data bucket associated to the device, create it with a custom prefix + the original device id.
- Update device location: Use the location provided in the gateways information to update thee current device location.
- Initialize downlink data: When creating a new device, initialize a custom downlink data, that can be modified and processed in further downlink requests.
Payload Processing
In this section it is possible to configure the payload processors that will transformate the raw data received from Sigfox payload in an uplink message, or the payload that is going to be sent in a downlink message fron Thinger.io Platform to Sigfox Clous
The interface provides a code editor for NodeJS, where it is possible to define the uplink and downlinkprocessors. It is also possible to test the code by providing a sample input data both for uplink and downlink.
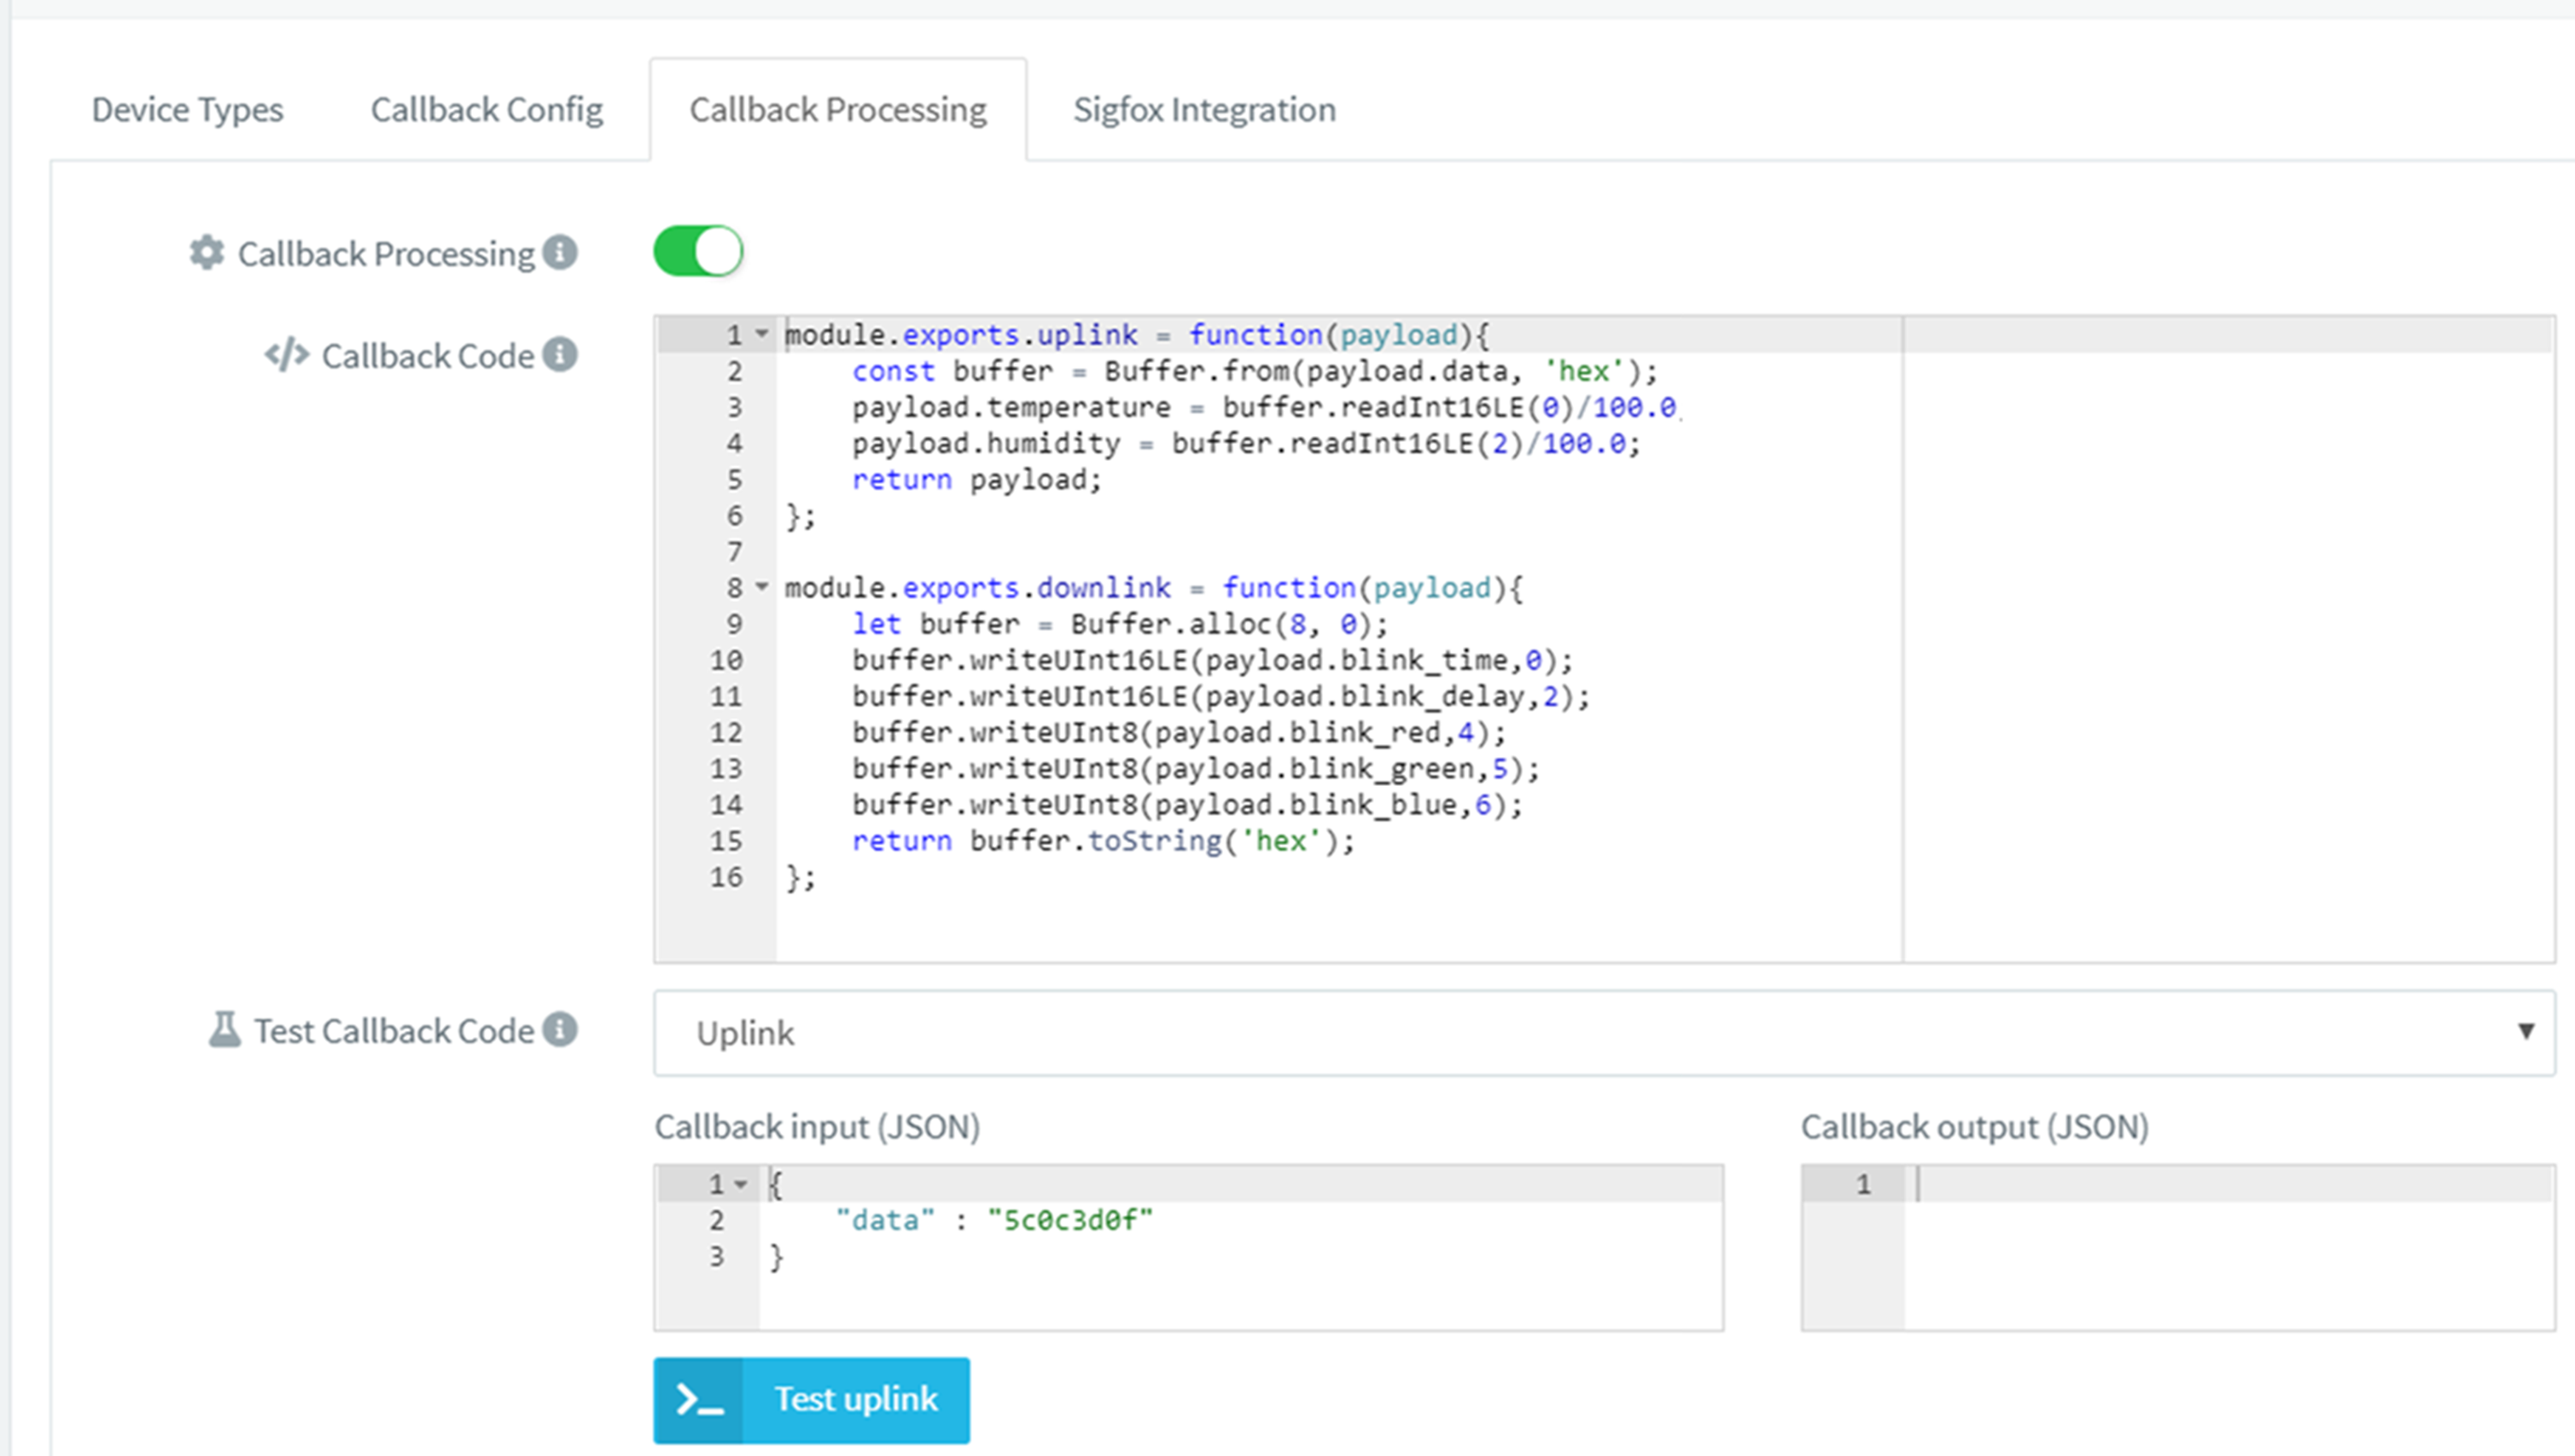
In the following, there is information about the uplink and downlink methods.
The uplink method will be called when a device sends a new message through the network. Depending on the configuration done in the Sigfox network, this function can receive two different inputs:
- Base64 String: If the Sigfox Device Type define a Custom payload format, this method will receive the raw payload encoded in base64. In this case, it will be necessary to write a function to transform this base64 data to a JSON object.
- JSON Object:The output of this method must be always a JSON object containing the information that is necessary to be used by the platform. In the following, there is an uplink method that converts base64 data into a JSON object with
temperatureandhumidityparsed from the binary data.
/* convert a base64 payload to a JSON object that can be used
  by Thinger.io */
    module.exports.uplink = function(payload){
    const buffer = Buffer.from(payload.data, 'hex');
    payload.temperature = buffer.readInt16LE(0)/100.0;
    payload.humidity = buffer.readInt16LE(2)/100.0;
    return payload;
};
Info
The uplink method must always return a JSON object.
The downlink method will be only called when the Sigfox device uplinks a bidirectional mesage to Sigfox Cloud. In this case, Thinger.io server will answer to the callback message that contains your custom Downlink payload in hexadecimal codification. Check out the next sections for more details.
This function will receive different inputs depending on how the plugin is called over its REST API.
- JSON Object: If the downlink call is done for a Thinger.io device that defines a
downlinkproperty (that is automatically initialized ifInitialize Downlink Datais configured in the plugin), this method will receive the JSON content of this property. It usually consists on a user-friendly device configuration that should be later encoded to binary in base64. - JSON Object: If the plugin downlink request contains a JSON payload in the POST call, this function will receive this payload instead of the one configured in the device
downlinkproperty.
The output of this method will be a Base64 String with the binary information that is going to be sent to Sigfox network.
Warning
When working with Downlink processes theInitialize Downlink Dataparameter must be initialized with any data otherwise the processing of the downlink payload will fail
Example of a downlink method converting a JSON device configuration into base64 as required by Sigfox:
/* convert a JSON object with the device configuration in a base64
  string expected by Sigfox Cloud */

module.exports.downlink = function(payload){

    let bytes = [];
    bytes[0] = payload.enabled ? 1 : 0;
    bytes[1] = payload.frequency;
    bytes[2] = payload.threshold;

    return Buffer.from(bytes).toString('hex');
};
Info
Use the interface tester to see if your code is correctly procesing the payloads.
Sigfox Cloud Configuration
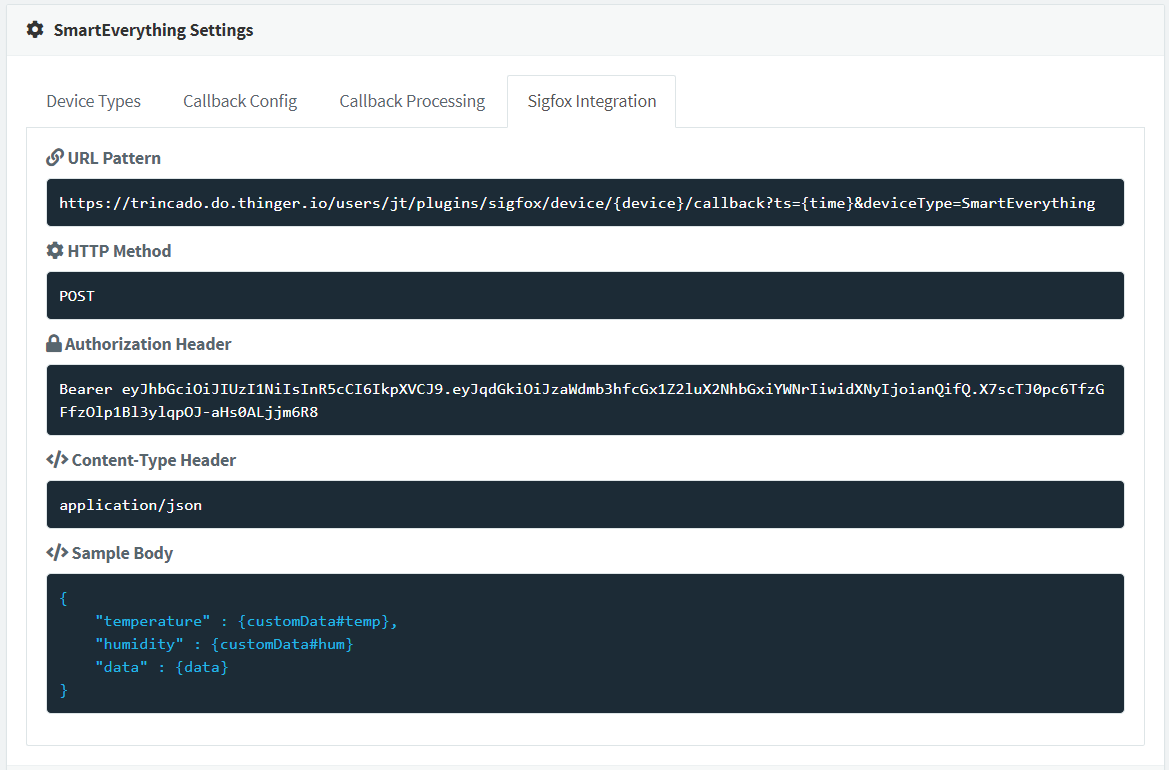
After getting Thinger.io Plugin ready for receiving data, the next step is to configure the Sigfox Backend for pushing messages on it. This process has been simplified by the "Sigfox Integration" section of the plugin settings menu, that automatically builds the HTTP query and the Authorization token that needs to be included into Sigfox Callbacks Manager:
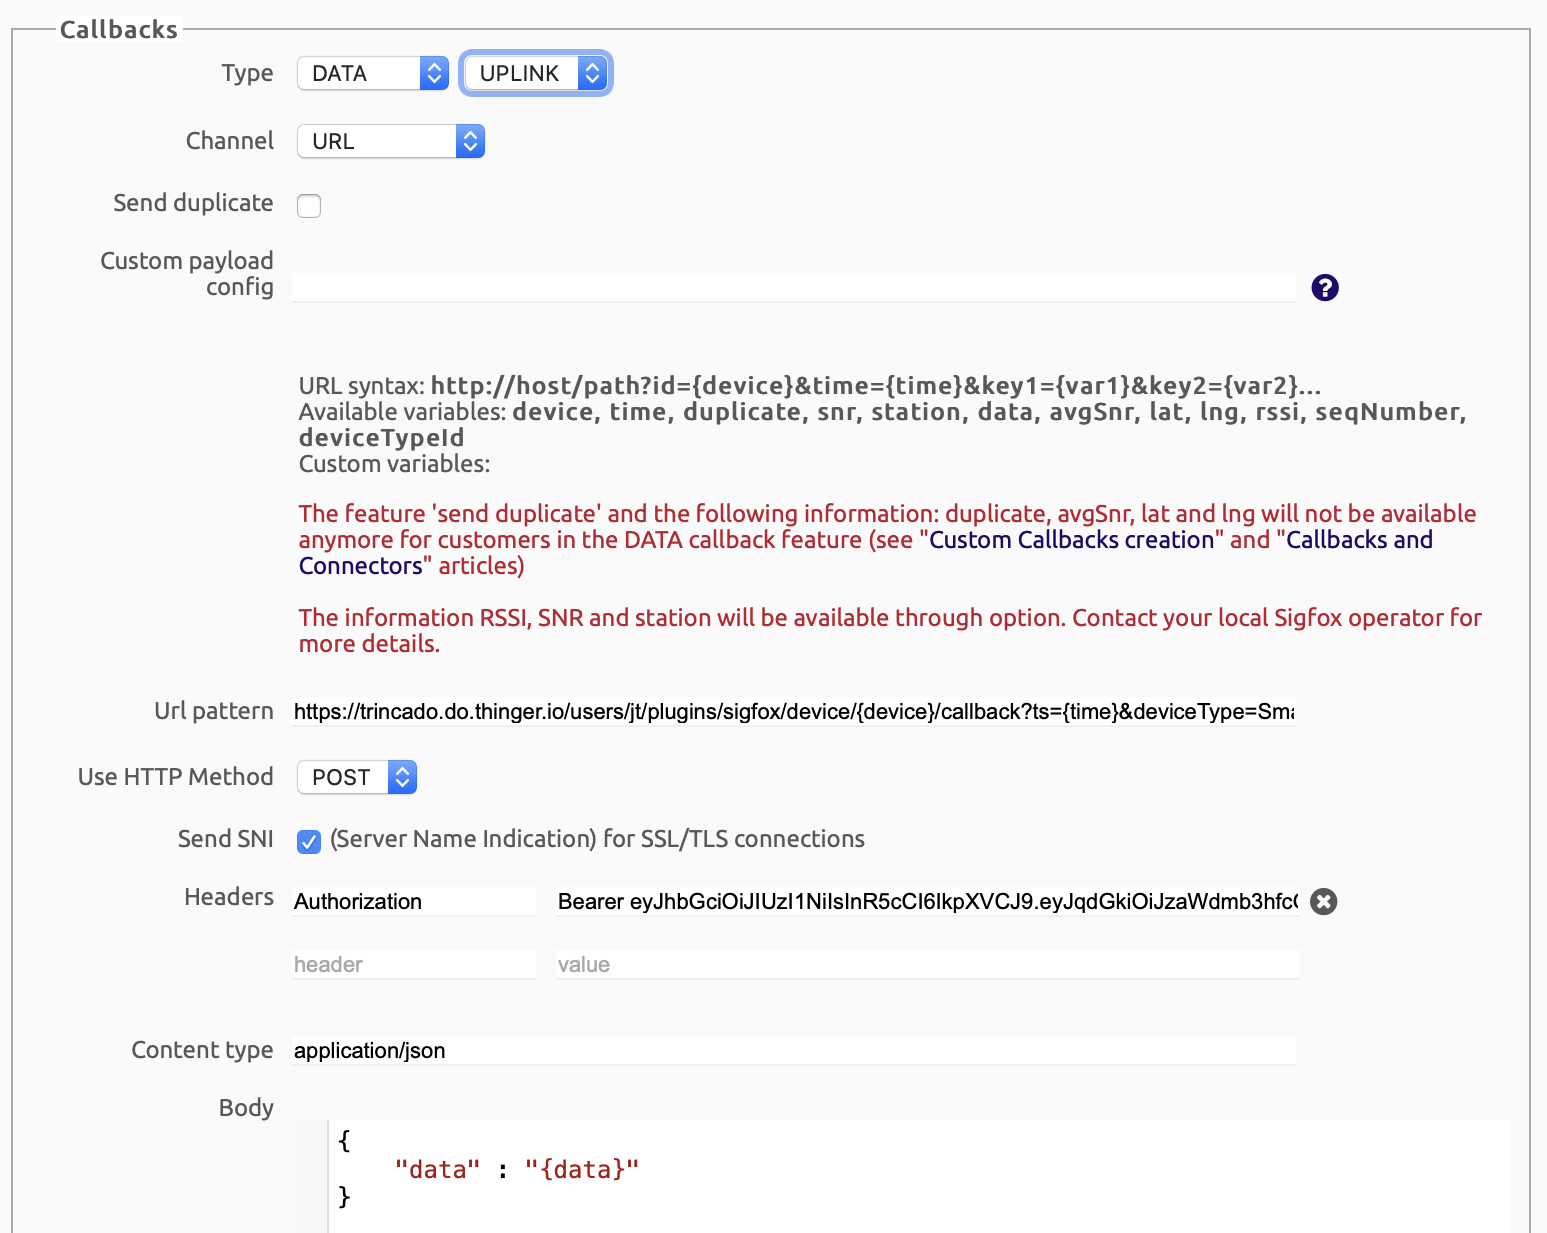
Note that Sigfox Cloud provides three different API, depending on the kind of interaction that it's going to be created, Thinger.io Platform allows integrating with all of them: Uplink, Advanced Data and Downlink callback type. Each callback configuration can be created to work with a single device or over all the devices that belongs to the same Device Type.
These are all the parameters that needs to be configured when creating a new callback:
- Callback Type: to define the callback behaviour.
- Custom Payload Config: (optional) to define how the device's message is going to be decoded.
- Url Pattern: place here the autogenerated Thinger.io URL pattern
- HTTP Method: POST for Uplink or GET for Downlink process.
- Authorization Header: must contain the autogenerated authorization to provide Sigfox Cloud the permission to send data to Thinger.io.
- Body: Configurable message payload with the specified content type.
Basic Uplink Integration
This callback configuration is the most common one, it just send devices data to Thinger.io in an unidirectional way to be stored, aggregate and show.
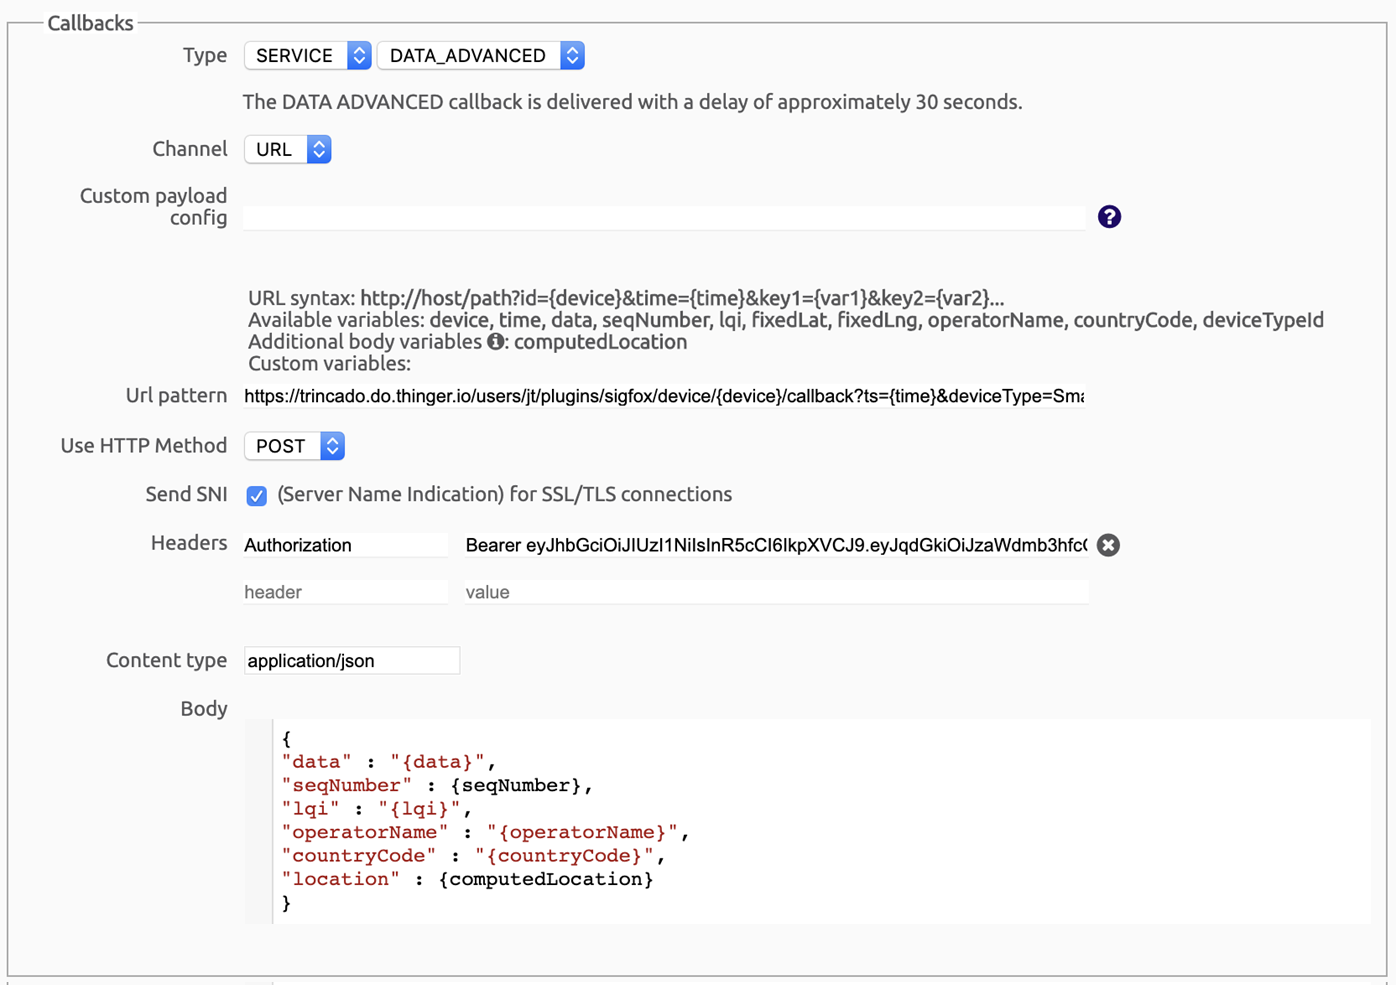
Uplink with computed location (Data Advanced)
This callback configuration allows to retrieve additional information, such as geolocation, and infrastructure metadata like the computed over the different base stations which received the messages. However, working with this callback requires a delay of approximately 30s.
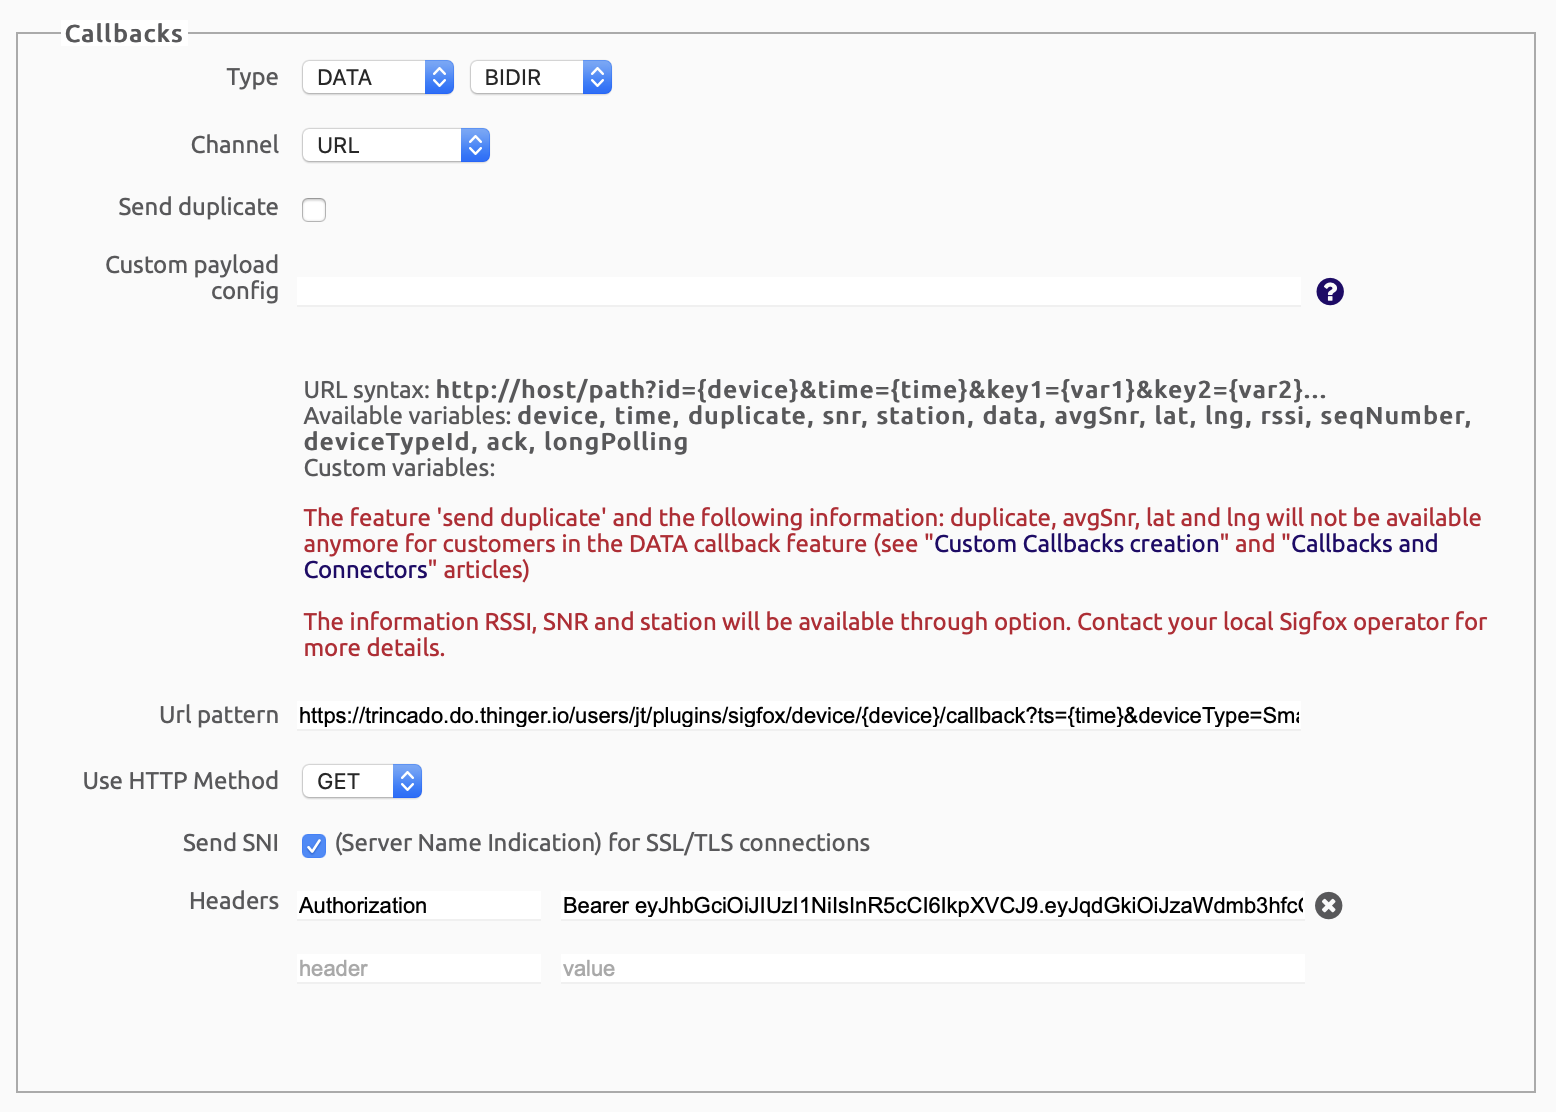
Uplink & Downlink
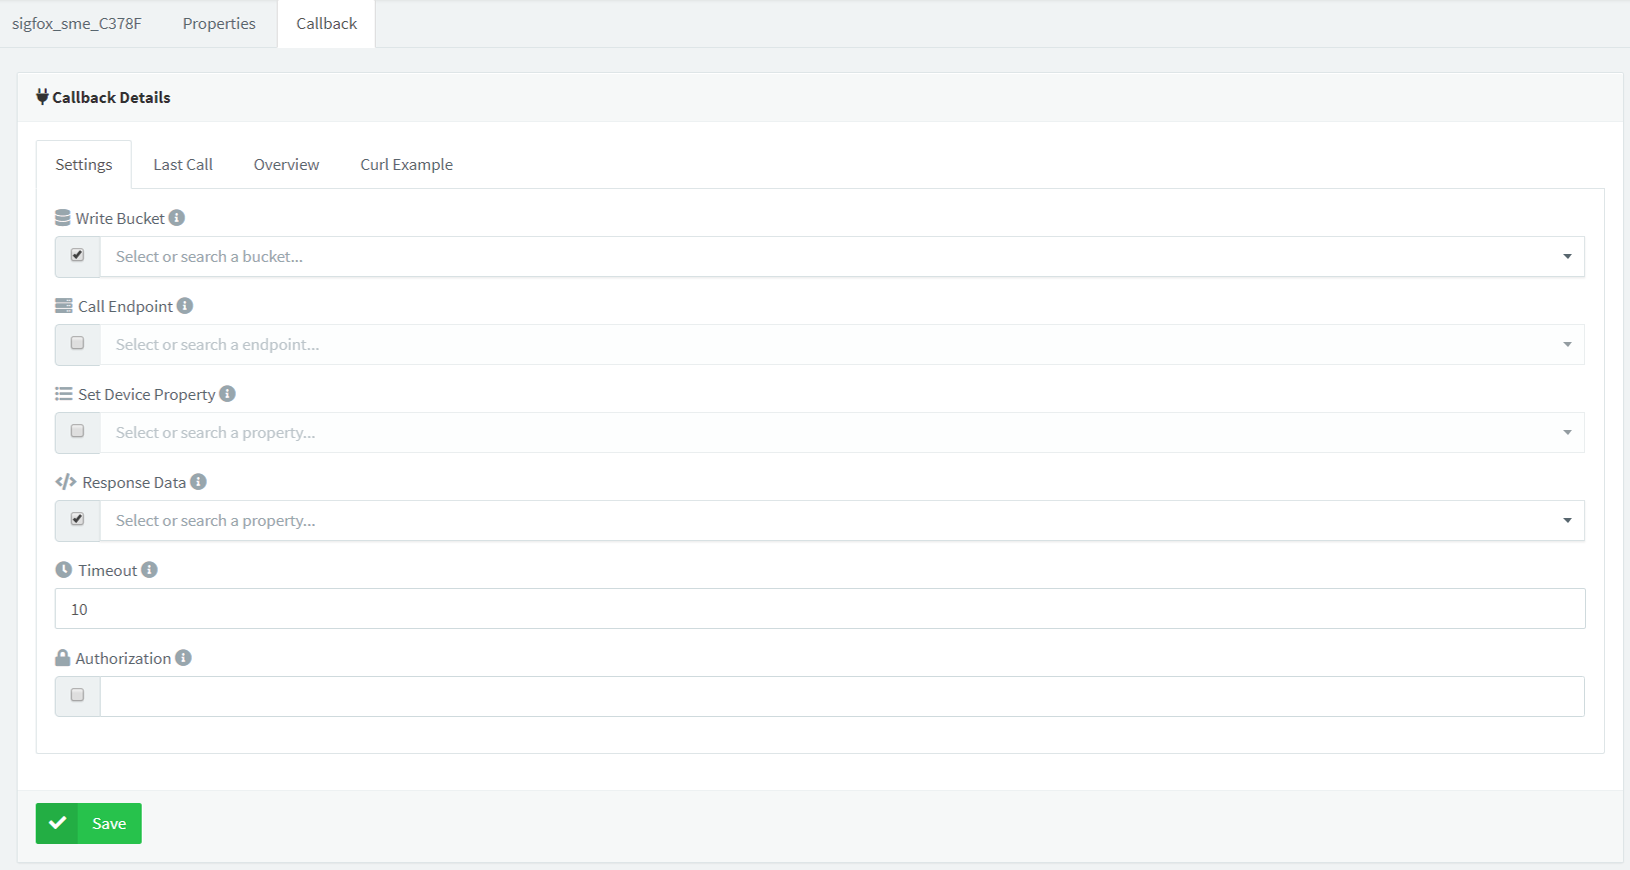
Finally, selecting DATA/BIDIR Callback, it is possible to send uplink messages to configure Sigfox Cloud to send data to Thinger.io and waits for a downlink message that can be sent to the device in order to make any configuration or remote controlling processes. downlink payload processing
The configuration of the Downlink message payload can be made in Thinger.io Platform, using the Callback Config section of Sigfox Plugin or modifying each individual Downlink device property in the device dashboard:
Tip
It is mandatory to send the device in the callback payload. Other optional values are signal or location information extracted from Sigfox.
Using platform features with Sigfox devices
congratulations now you can retrieve data from all your Sigfox devices into Thinger.io platform and benefit from all its management, analysis and representation features to create amazing IoT projects in a very simple way. Here you have some basics about thinger.io capacities for Sigfox devices:
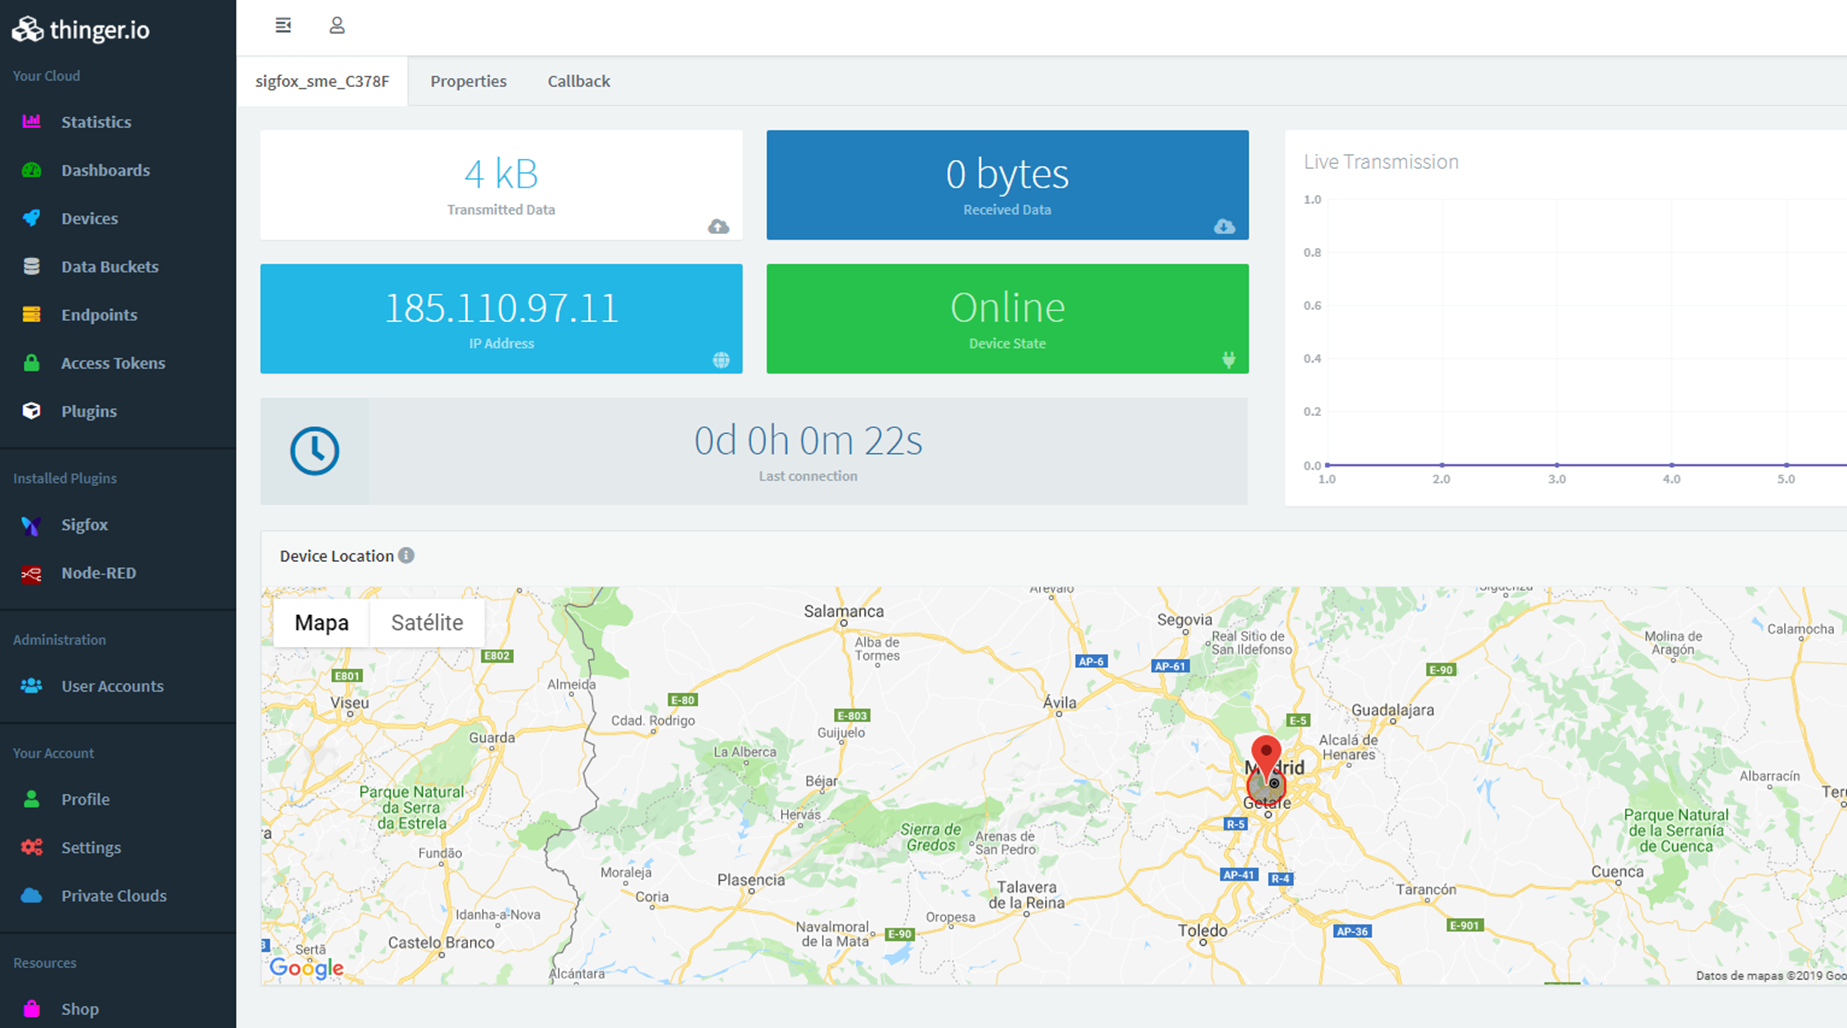
Checking device status
As these devices are not real-time connected to the platform, it is hard to know if everything is running well in the long term, specially in large devices networks. But thanks to the timeout feature that is configurable using the "device connection timeout" of the plugin callback configuration menu, it is possible to know if a device is sending data in proper time frame or if otherwise it has stopped working due to any problem by checking the "device status" that is available at its dashboard.
It is also possible to check the status of a large amount of devices from the device list, but note that this page is not showing real-time data so it is necessary to refresh it to know the current status.
Storing data in scalable buckets
One of the most used features of Thigner.io is the data buckets, which allows storing thousands of data in a scalable and easy way. The integration with sigfox through this new plugin allows to store data after the payload has been processed instead of storing it in raw or constraint format.

Once stored in a data bucket, it is possible to work with these data points by downloading them in CSV and creating widgets to show data in customizable dashboards that can be easily shared with colleagues or customers.
Sending Data to Third Parties with Endpoints
Thinger.io is part of a large ecosystem of technologies and platforms that enable you to get the most value from your data. That's why we have an Endpoint tool that allows you to forward data from any device to third party platforms and use other internet services to send emails, telegram messages, dump data on google spreadsheets, so almost any Internet service.
Combine with other Plugins
at thinger.io we continue to work to extend the platform's integration capabilities with technologies that can help create more advanced IoT projects in the easiest way. We have other plugins such as NodeRED that allow working with IoT data in almost unlimited ways, such as creating alerts on the data, geofencing, reporting, etc.

Plugin Development Details
Uplink Data Flow
In this section it is described how the uplink data flow works, from its source in the Sigfox network, to its final destination in Thinger.io.
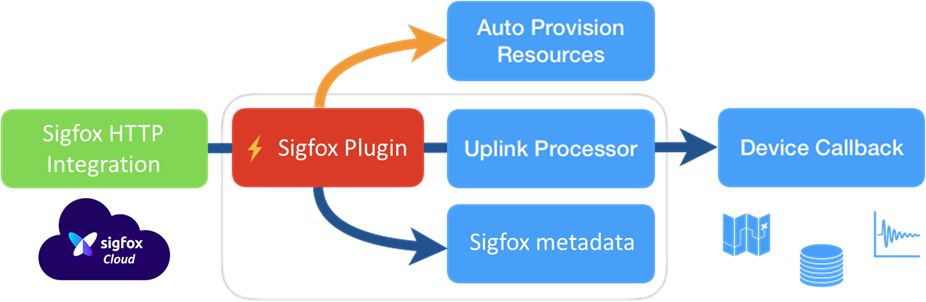
In the following subsections are described the elements shown in the figure.
Sigfox Uplink Callback
When Sigfox receives a message from any device, it automatically checks its configured integrations to forward them the information received. This plugin is integrated over HTTP, so, the Sigfox network will issue an HTTP request to the Thinger.io plugin on new messages.
Sigfox Plugin
Thinger.io plugin receives data from Sigfox network in a JSON format. The callback includes several fields of information, such as app_id, dev_id, donwlink_url, metadata, or the actual payload information sent by LoRa devices on payload_fields or payload_raw fields, depending on the Payload formats configured in the Sigfox application.
Here is an example of the raw information received by the plugin:
Once this information is received by the plugin, it is processed in order to execute the following actions in Thinger.io:
- Auto provision new device and its associated data bucket if the device does not exists on the platform. It is based on the
dev_idfield. - Call device callback that will actually push processed data to its associated data bucket, but could do any other action like forwarding data to other endpoints.
Uplink Processor
This plugin allows to configure custom code for processing incoming data. The information sent by Sigfox devices is normally encoded in small binary payloads that cannot be directly used for representation, as they should not contain tags, JSON, ascii text, etc., in order to minimize transmission time. So, it is required to process the data sent by devices in some point of the cloud.
This plugin also allows to create custom decoders if necessary. The advantage of using the Thinger.io payload processing (if necessary), is that it is using NodeJS runtime instead of plain Javascript, so it is possible to use NodeJS modules like Buffer, that simplifies the condig of the processing functions.
Internaly, payload processors are precompiled after its configuration in the plugin, and executed with the payload data received from Sigfox. The output from this function (if it gets executed), is then transmitted to the next final step, which is the device callback.
Device Callback
The last step of this plugin is to call the device callback in Thinger.io. This plugin auto provision new Sigfox devices as HTTP devices. HTTP devices inside Thinger.io are generic devices that can push data over REST API methods. Thinger.io will be responsable of taking input data and perform different configurable actions with it, like change the device state to connected/disconnected; write provided data to a configured data bucket; send this information to other services over an endpoint; store the provided information as a device property; or return data from one of the device properties.
In this case, the plugin interacts with the platform over such REST interface, pushing data received from Sigfox, and processed by the custom uplink method. By default, the plugin initializes an HTTP device to write to a data bucket that is also automatically created. So, every message sent by a Sigfox device, will write finally write to a specific data bucket. As shown in the following picture:
After the device callback is done, it will appear as a connected device, showing also its location if it was configured in the plugin options.
Vendor Integrations
Simple Hardware
Downlinks
SimpleHw device settings are stored in downlink registers as values and changing these values will change the settings and also device behavior. Register values can be changed via downlink over the air and up to 4 register values can be changed with one downlink - 4 bytes are register pointers from 0x00 to 0xFF and 4 bytes are register values from 0x00 to 0xFF for a total of 8 bytes (sigfox downlink limit). More details here.
So, it is possible to update up to 0xFF registers from any device, at any moment by using downlinks. However, updating more than 4 registers involves several downlink requests where different registers at downloaded at each time. With the Sigfox plugin extension it is possible to create the required flows to update any amount of registers by using the chaining feature from SimpleHw devices.
The following code is a template with a set of features to correctly work with SimpleHw devices:
- Downlink sequence processing to affect how the device behaves: If the received register bytes are ascending from left to right, the device will automatically request another downlink.
- Acknowledgement from devices is processed to confirm that downlinks has been received correctly in the device.
- Selective register downlink synchronization based on register changes and confirmed registers.
/// state object to handle per-device registers and its acks
let state = {};

// confirm downlink is received on the device state
function confirmDownlink(device){
    if(!state.hasOwnProperty(device)) return;

    // get elements to ack
    let toAck = state[device].toAck;
    if(toAck===undefined) return;

    // initialize acks if not already defined
    if(state[device].ack===undefined) state[device].ack = {};

    // update acknowledged
    for(let key in toAck){
        state[device].ack[key] = toAck[key];
    }

    // clear pending elements
    delete state[device].toAck;
}

// selects the registers that are required to send
function getRegistersToSend(device, target){
    if(!state.hasOwnProperty(device)) return target;
    let current = state[device].ack;
    if(!current) return target;
    let modified = {};
    for (var key in target) {
        if(!current.hasOwnProperty(key)){
            modified[key] = target[key];
        }else if(current[key]!==target[key]){
            modified[key] = target[key];
        }
    }
    return modified;
}

// convert JSON device downlink data to register configuration
function getRegistersConfig(payload){
    // should return an object with register number & its value
    let example = {
        "2c" : 3,
        "aa" : 217,
        "3f" : 99,
        "0c" : 1
    }
    return example;
}

// uplink method definition
module.exports.uplink = function(payload, meta){
    let deviceId = meta.device;

    // acks to downlink
    if(payload==="15"|| payload==="16"){
        confirmDownlink(deviceId);
        // return undefined so nothing is stored in bucket
        return undefined;
    }

    // normal payload procesing here
    // ...
    return payload;
};

// downlink method definition
module.exports.downlink = function(payload, meta){
    let deviceId = meta.device;

    // get device registers
    let deviceRegisters = getRegistersConfig(payload);
    let changedRegisters = getRegistersToSend(deviceId, deviceRegisters);

    // compute registers to send and its order
    let registers = Object.keys(changedRegisters);
    if(registers.length>4){
        // ascending -> device will request more
        registers = registers.sort().slice(0,4);
    }else{
        // desdencing -> no more downlinks
        registers = registers.sort().reverse();
    }

    // init toAck state on device
    if(!state.hasOwnProperty(deviceId)) state[deviceId] = {};
    state[deviceId].toAck = {};

    // generate downlink output
    let bytes = [], written = 0;
    registers.forEach(function(v) {
      // write register number and its value
      bytes[written++] = parseInt(v, 16);
      bytes[written++] = changedRegisters[v];

      // add register to pending ack
      state[deviceId].toAck[v] = changedRegisters[v];
    });

    // convert buffer to hex for sigfox processing
    return Buffer.from(bytes).toString('hex');
};