ChirpStack
![]()
ChirpStack is a flexible, open-source LoRaWAN® Network Server that allows organisations to deploy and operate their own private or public IoT networks with full control over infrastructure and data. It is widely used by companies, research institutions, and communities looking for reliable large-scale LoRaWAN deployments without vendor lock-in.
With Thinger.io, ChirpStack users can easily extend their networks by adding powerful tools for storing, analysing, and visualising device data in real time. This integration helps transform raw LoRaWAN traffic into actionable insights, dashboards, and long-term records.
The plugin bridges ChirpStack with Thinger.io through the Products feature, enabling automatic device and bucket provisioning, as well as flexible uplink and downlink processing pipelines that can be fully customised to the needs of each project.
Getting Started
Prerequisite
Devices within the selected ChirpStack Application must be homogeneous—same type and model—so that autoprovision can assign the correct product template.
- Install the plugin inside your Thinger.io account.
See the guide “How to install a plugin” on the Marketplace if you are not familiar with the process.
Plugin Configuration
Open the plugin settings page. In the Applications table click Add + and fill in:
| Field | Description |
|---|---|
| Application Name | Must match exactly the Application ID defined in ChirpStack. The plugin uses this value to correctly associate uplinks and downlinks with the right application. |
| Device ID Prefix | Prefix used when generating the device identifier; the Device EUI is appended automatically. Required for autoprovision of devices in Thinger.io. |
| Access Token | API token generated in ChirpStack to allow secure communication with the Network Server. This is required to authenticate all requests. |
| Server URL | The base URL of your ChirpStack instance. Since ChirpStack is self-hosted, you must provide the public or private endpoint where your server is running. |
| Port | The gRPC service port exposed by ChirpStack (default is 8080). If you are running ChirpStack behind a reverse proxy, make sure this port is accessible or properly forwarded. |
| Enabled | Toggles the application integration on or off. |
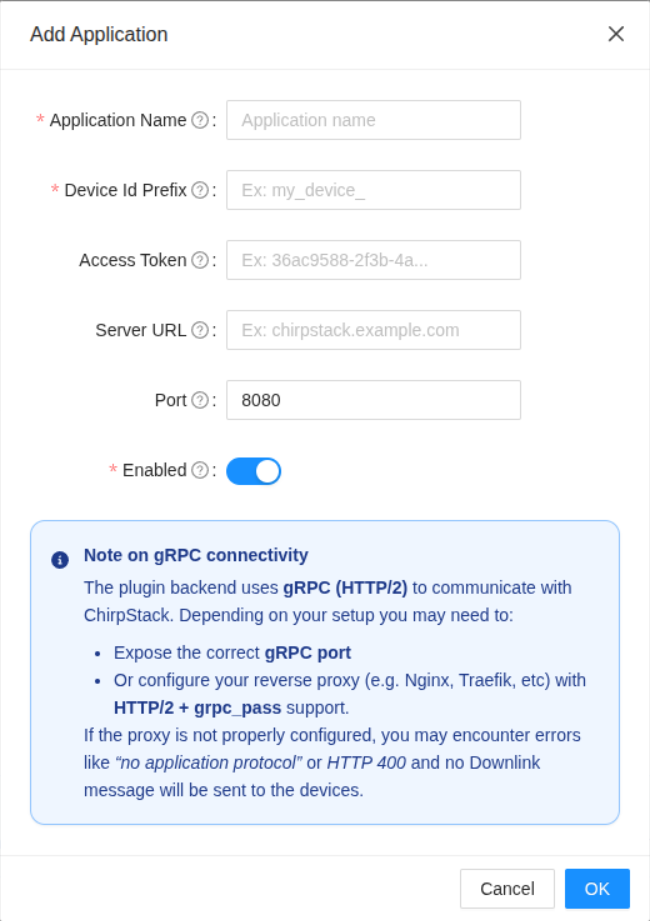
Unlike TTN or LORIOT, ChirpStack must be deployed and managed by the user. The plugin backend communicates with ChirpStack using gRPC (HTTP/2), which provides efficient and real-time interaction but also requires that the gRPC service port is reachable by Thinger.io.
In most cases, you will need to either:
-
Expose the correct gRPC port on your ChirpStack instance, or
-
Configure your reverse proxy (e.g., Nginx, Traefik, etc.) to support HTTP/2 + grpc_pass.
Since ChirpStack is self-hosted, network accessibility is critical. In our tests we verified connectivity by forwarding the gRPC port from the router directly to the ChirpStack server, ensuring uplinks and downlinks were processed correctly.
ChirpStack Webhook Configuration
Log in to the ChirpStack Application Server and select the target Application.
Navigate to Integrations → Add Integration and choose the generic HTTP integration (since there is no specific Thinger.io template available yet).
Complete the form with the values provided by the Thinger.io plugin:
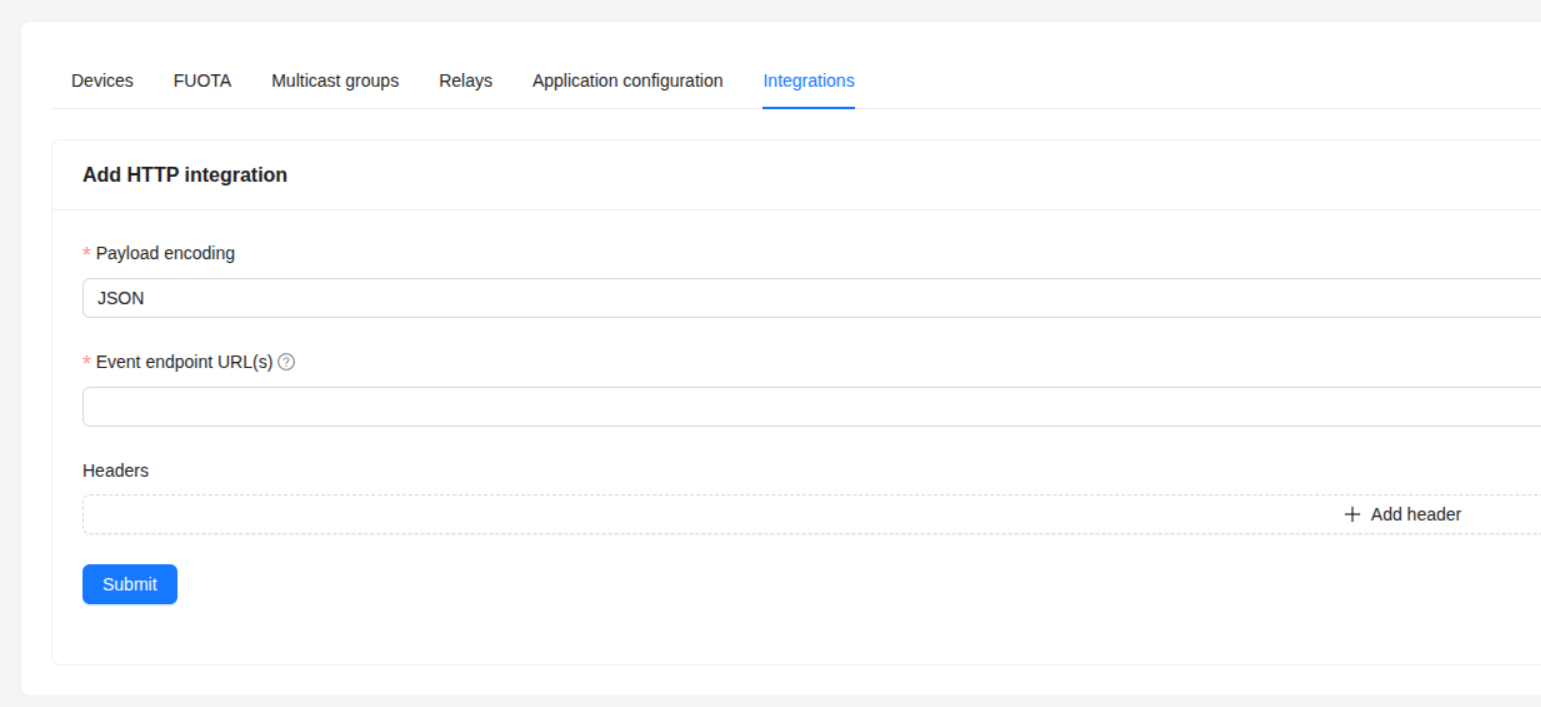
| Field | Value |
|---|---|
| Event endpoint URL(s) | Copy the value shown in the plugin under Endpoint Base URL for Uplinks. ChirpStack will send all application traffic (uplinks, join events, acknowledgements) to this endpoint. |
| Headers | Add a new header with key Authorization and value equal to the ChirpStack API Token provided in the plugin settings page. |
After saving, uplink traffic will start appearing in the plugin Logs panel. At this point the devices may still be unrecognised; autoprovision occurs once a matching Device Template is installed or created.
More details on HTTP integrations can be found in the ChirpStack documentation.
Device Templates
Device templates define:
- The expected data structure for an specific thinger product
- Uplink / downlink processing scripts
- Default dashboards, device properties and data buckets
Install a Device Template
Search the Marketplace for a template that matches your device model. If none exists, you can create your own template. Notice that, in Thinger.io, a Product is a template that defines the structure and behaviour of a device and can also be installed as a plugin.
Important
Ensure the template autoprovision prefix matches the Device ID Prefix configured in the plugin.
License
![]()
This plugin is released under the MIT License:
Copyright © Thinger.io

Permission is hereby granted, free of charge, to any person obtaining a copy
of this software and associated documentation files (the “Software”), to deal
in the Software without restriction, including without limitation the rights
to use, copy, modify, merge, publish, distribute, sublicense, and/or sell
copies of the Software, and to permit persons to whom the Software is
furnished to do so, subject to the following conditions:

The above copyright notice and this permission notice shall be included in
all copies or substantial portions of the Software.

THE SOFTWARE IS PROVIDED “AS IS”, WITHOUT WARRANTY OF ANY KIND, EXPRESS OR
IMPLIED, INCLUDING BUT NOT LIMITED TO THE WARRANTIES OF MERCHANTABILITY,
FITNESS FOR A PARTICULAR PURPOSE AND NONINFRINGEMENT. IN NO EVENT SHALL THE
AUTHORS OR COPYRIGHT HOLDERS BE LIABLE FOR ANY CLAIM, DAMAGES OR OTHER
LIABILITY, WHETHER IN AN ACTION OF CONTRACT, TORT OR OTHERWISE, ARISING FROM,
OUT OF OR IN CONNECTION WITH THE SOFTWARE OR THE USE OR OTHER DEALINGS IN
THE SOFTWARE.